Appearance
JOB CENTER
The Job Center in the Warehouse Management System (WMS) is designed to manage different tasks related to inventory items. This section includes options for performing quality control, handling repairs, and conducting cleaning tasks. Follow the instructions below to navigate and use each section effectively.
Overview
The Job Center menu includes the following options:
Job Center Menu
QC (Quality Control)
Repair
Overview of the Job Center Menu
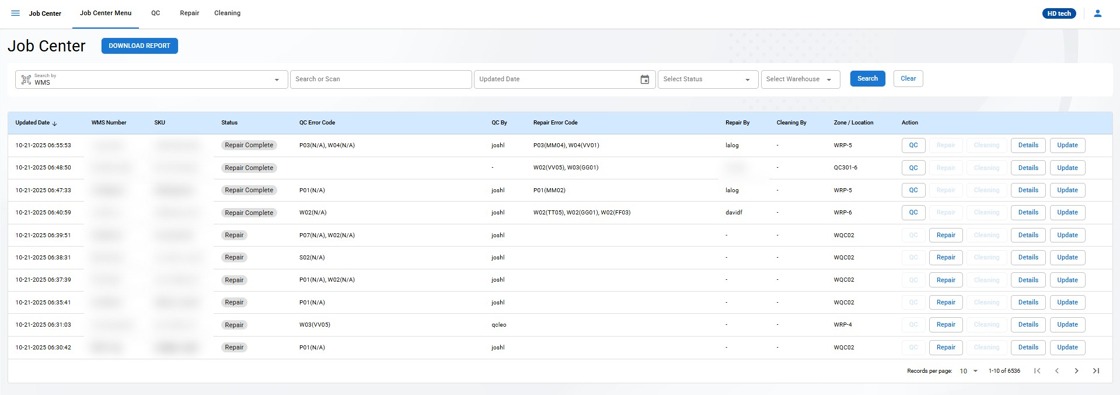
The Job Center Menu page displays a table of items along with relevant information and available actions. You can search for items, view their details, and perform necessary actions such as QC, repair, or cleaning.
Step-by-Step Instructions
Accessing the Job Center Menu Page
- Navigate to the Job Center and click on Job Center Menu to access the list of items requiring QC, repair, or cleaning.
Search and Filter Options
Search by Dropdown: Select the criteria by which you want to search (RMA, WMS Number, Serial Number, Control Number, Pallet Number, Bin Number, Box Number).
Search or Scan Field: Enter or scan the search term to find specific items.
Updated Date Filter: Select a date to filter items based on their last updated date.
Status Dropdown: Choose the status (e.g., QC, Repair, Clean) to filter items accordingly.
Warehouse Dropdown: Use this to filter and display items from a specific warehouse.
Click the Search button to apply the filters.
Click the Clear button to reset the filters and display all items.
Table Columns
Updated Date: Displays the date and time when the item was last updated.
WMS Number: Shows the WMS Number associated with the item.
SKU: Displays the Stock Keeping Unit (SKU) of the item.
Status: Indicates the current status of the item (e.g., QC, Clean).
QC Error Code: Displays any error codes identified during the QC process.
QC By: Shows the username of the person who performed the QC.
Repair Error Code: Displays any error codes identified during the repair process.
Repair By: Shows the username of the person who performed the repair.
Cleaning By: Shows the username of the person who performed the cleaning.
Zone / Location: Displays the zone or location where the item is stored.
Action: Provides buttons for QC, repair, and cleaning actions.
Action Buttons and Corresponding Statuses : This guide explains how the action buttons are enabled or disabled based on the status of an item. The action buttons allow you to perform specific tasks, and they become active (enabled) only when the item's status matches certain conditions.
QC Button:
Enabled when the item's status is:
QC
Repair Complete
Repair Button:
Enabled when the item's status is:
Repair
Repair Hold
Cleaning Button:
Enabled when the item's status is:
Clean
QC Complete
Details Button:
Always enabled.
Takes you to Item Details Page for the unit
Update Button
- Use to update the status of the case without changing the item into a QC / Cleaning or Repair Status
Performing Actions
QC: Click the QC button to initiate the quality control process for an item.
Repair: Click the Repair button to initiate the repair process for an item.
Cleaning: Click the Cleaning button to initiate the cleaning process for an item.
Pagination
Records per page: Use the dropdown at the bottom right of the table to select the number of records displayed per page.
Navigation: Use the pagination controls to navigate between pages of the item list.