Appearance
Scanning Items
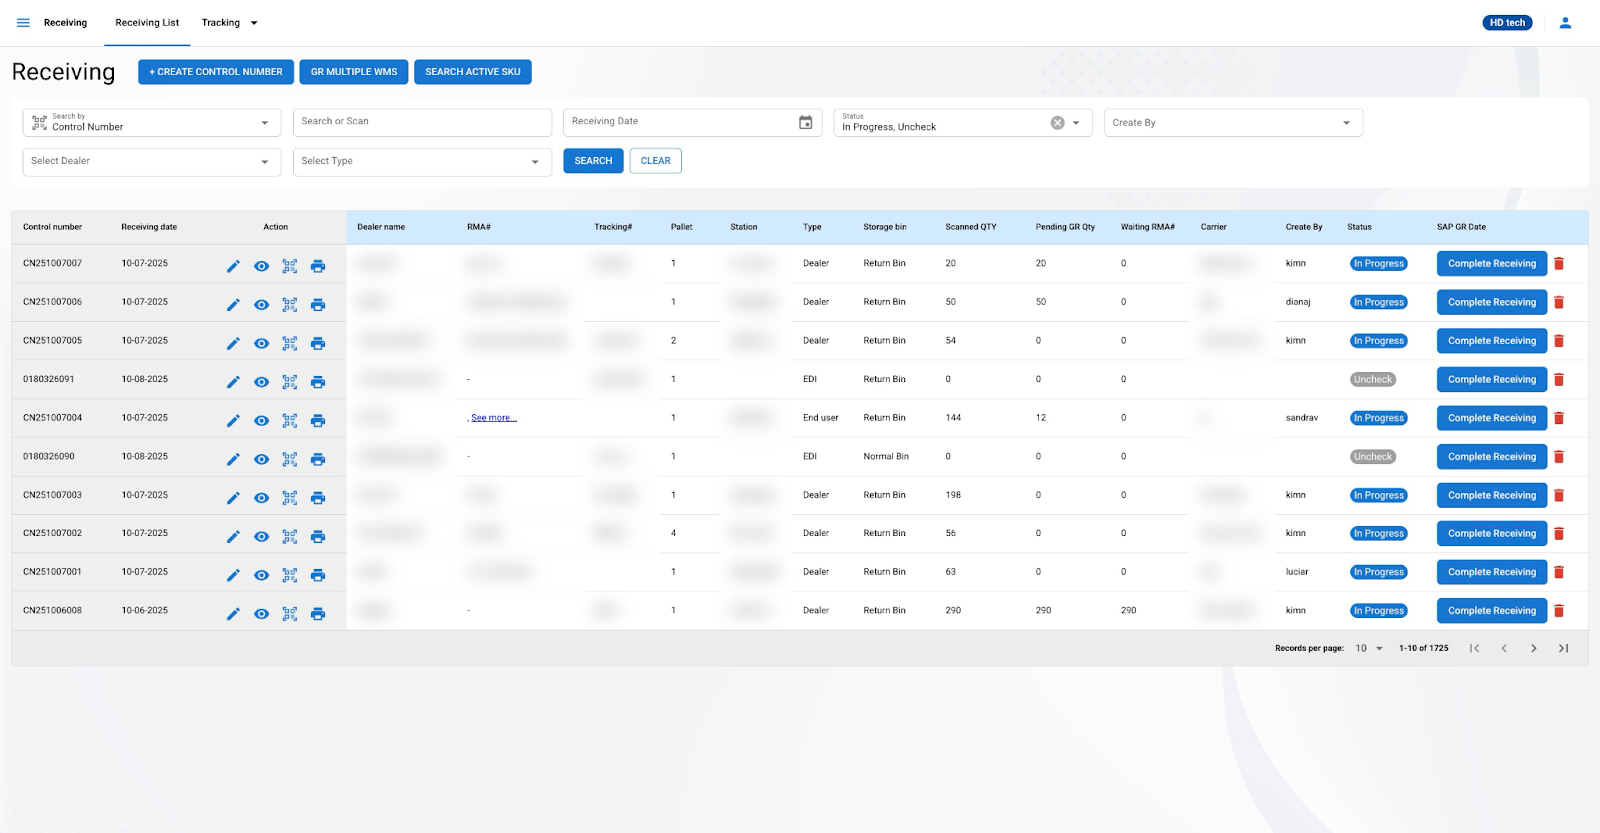
The scan page allows users to document the details of items as they are physically received in the warehouse, including items that are received as part of a bulk process or those designated for scrap. To access the scan page, users must initiate the process from the control number list.
Click the "Scan" button associated with that control number to open the scan page.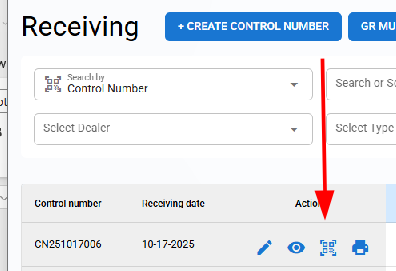
Receiving Action - Scan
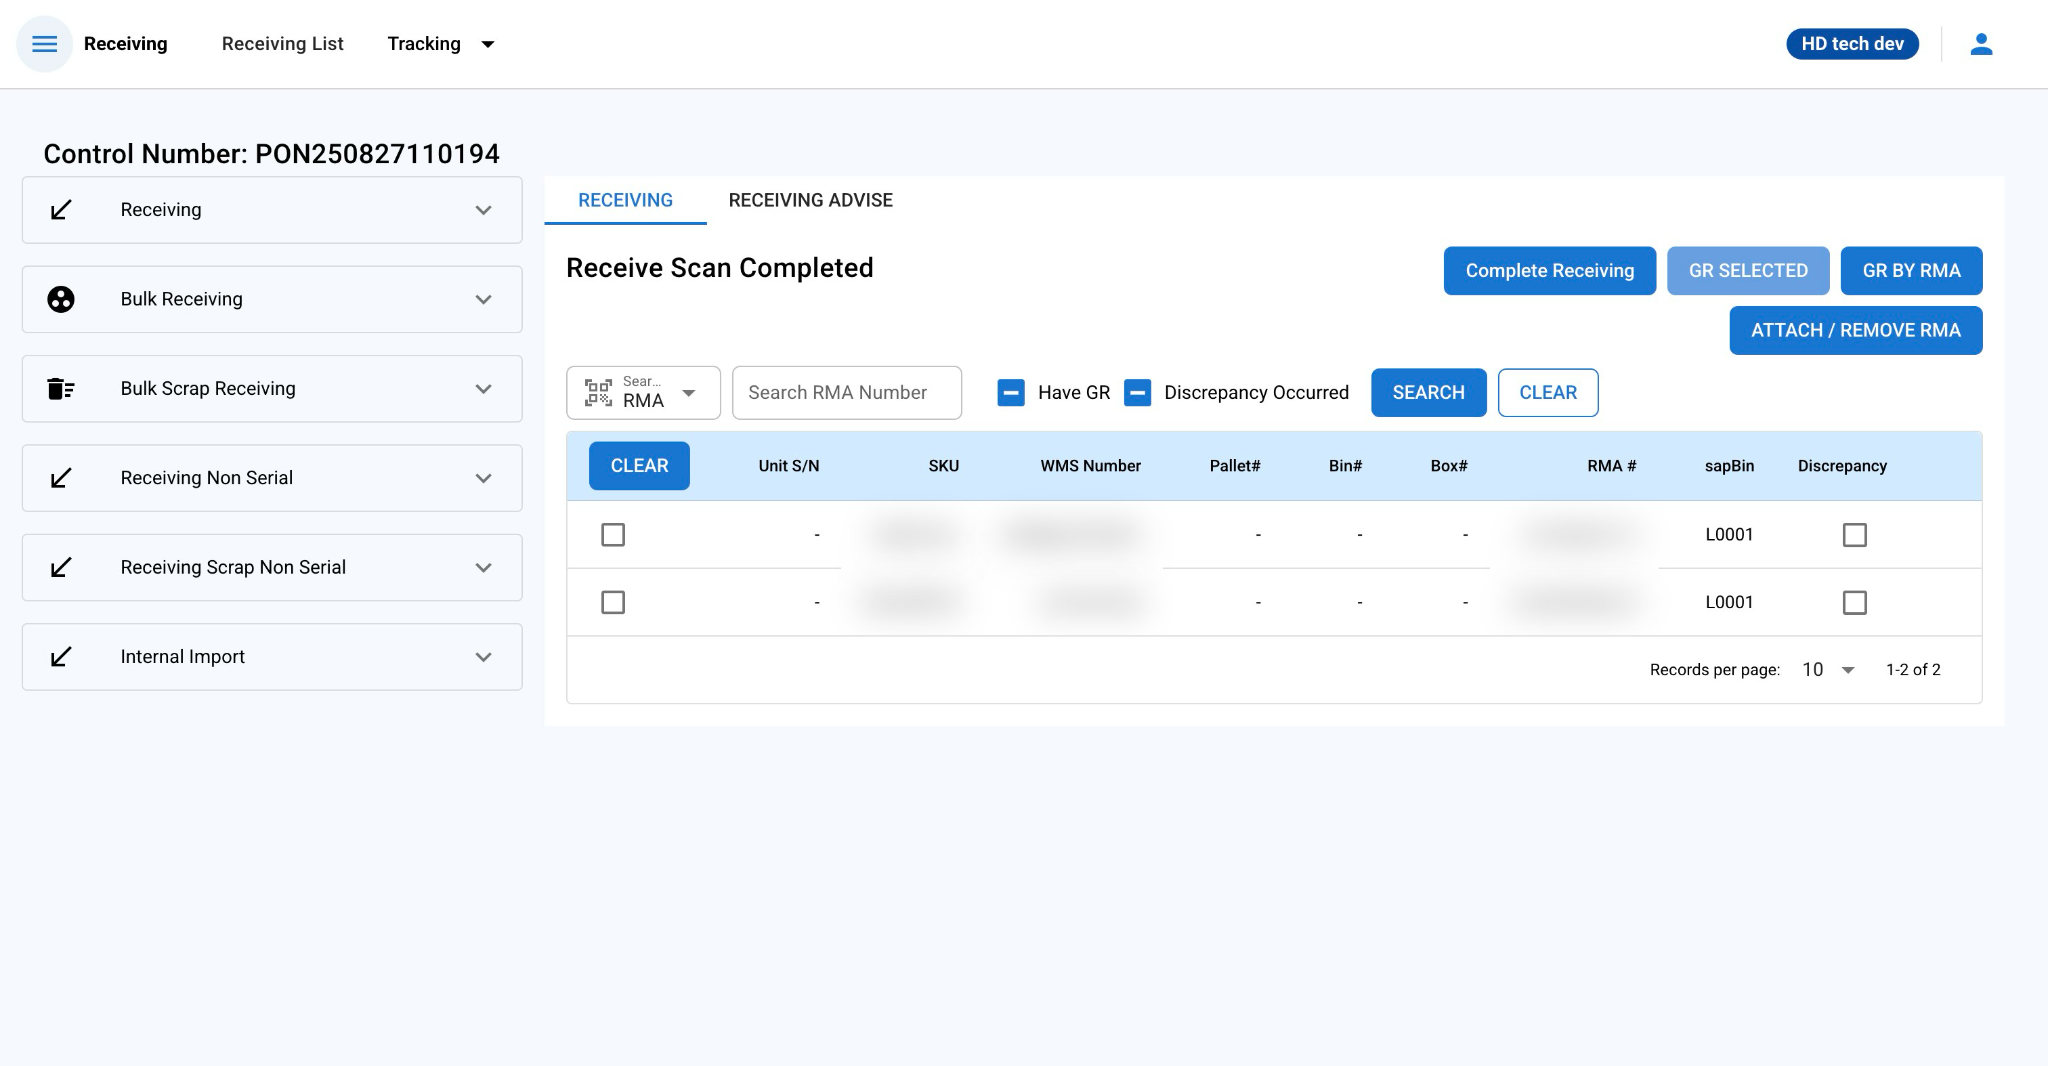
Receiving Item
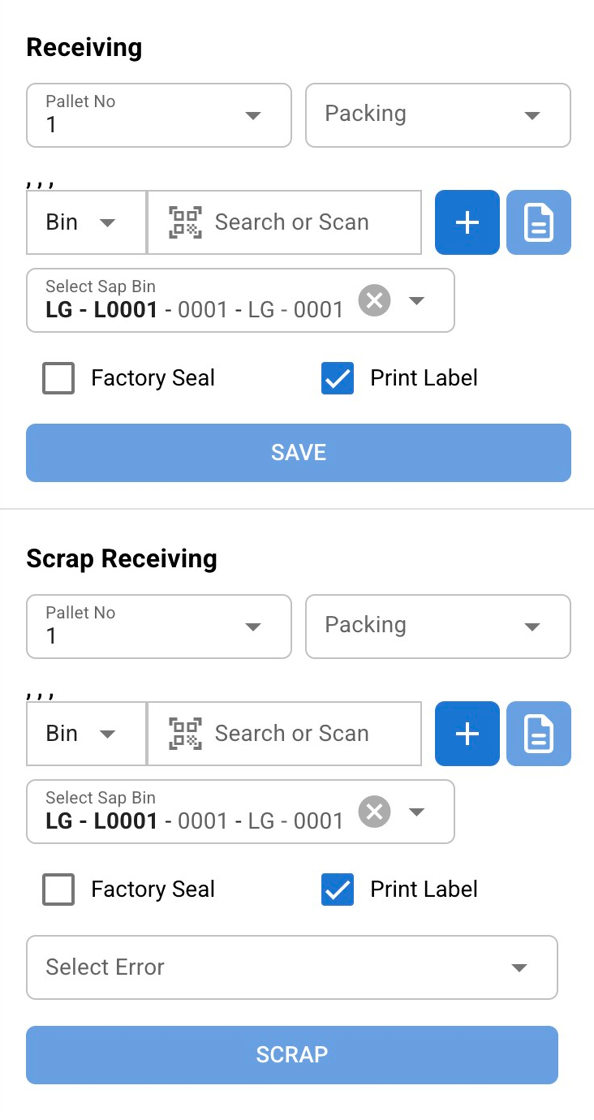
This section is for individual item/scrap and includes fields for documenting the specific details.
There are three sections:
Item Scanning and Details ****– For capturing item information via scanning or manual entry.
Receiving: Pallet and Location Regular ****– For assigning a storage location to received items. Item status will save as Inventory
Scrap Receiving: Pallet and Location Scrap – For assigning a location to items marked as scrap. Item status will save to "Pending Scrap"
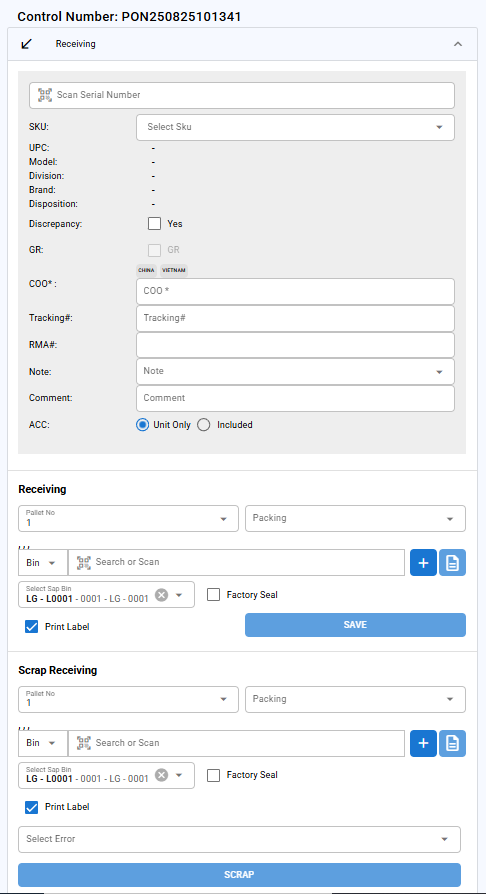
Item Scanning and Details
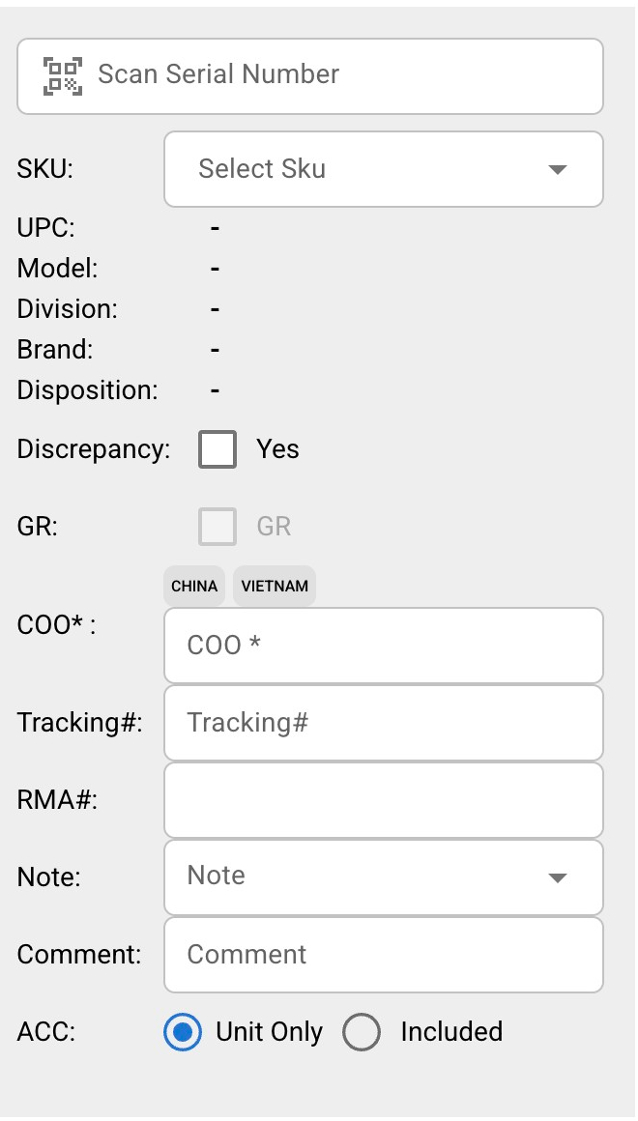
This gray section is where you scan or manually enter the item's serial number and associated details. It captures essential metadata for the item, including origin, condition, and any notes. Scanning is recommended for efficiency and accuracy, but manual entry is available for overrides.
The scanning section is used to validate and record details of each item/scrap as it is physically processed.
Auto-filled Information
Upon scanning an item's serial number, the system will automatically populate the following fields:
SKU
Model
Division
Brand
Disposition
COO (Country of Origin)
Tracking Number
RMA (Return Merchandise Authorization Number)
These fields are pre-filled based on the scanned information but can be adjusted according to the conditions below.
SKU Adjustment
- Users may select a different SKU from a dropdown list if the pre-filled SKU does not match the item. Only existing SKUs in the system are selectable.
Discrepancy Identification
- The Discrepancy checkbox is unchecked by default. Users can mark an item as discrepant if there is an issue with the received item that does not match the expected condition or documentation.
Goods Receipt (GR) Confirmation
- The GR checkbox indicates that the item is ready to be included in the Goods Receipt. Users cannot select this option if an item lacks an RMA number.
Country of Origin (COO) Specification
- The COO field is mandatory. Users must input the COO manually if the system does not auto-detect it from the scanned serial number.
RMA Number Management
- Users have the option to create a new RMA or select from existing RMAs in the system. Adding a new RMA will automatically update the RMA details within the associated control number. If the scanned quantity exceeds the quantity specified in the control number, the system will update the control number's total accordingly.
Notes and Comments
- Users can add notes and comments for additional context or instructions related to the scanned item.
Accessories Inclusion
- Users can indicate whether the scanned item includes additional accessories (ACC) or if it is a unit-only entry.
Receiving and Scrap Receiving Location Assignment
This middle section handles the location assignment for items that are being received into inventory. It specifies where the item will be stored (e.g., box, bin or pallet) and includes options for sealing and labeling. After saving, the item status is received in the system.
This bottom section is similar to Section 2 but designates the item for scrap processing. It assigns a location while marking the item as scrap, updating its status to "Pending Scrap" after Goods Receipt (GR). This flags it for disposal or recycling, preventing it from entering active inventory.

Pallet No: The number of the pallet being received.
Packing: Type of packing material or method used.
Container Number: There are four types of containers you can select: pallet, bin, box and master carton. The container is where you will place the items for storage and tracking within the warehouse. You can click on the + button to add a new container
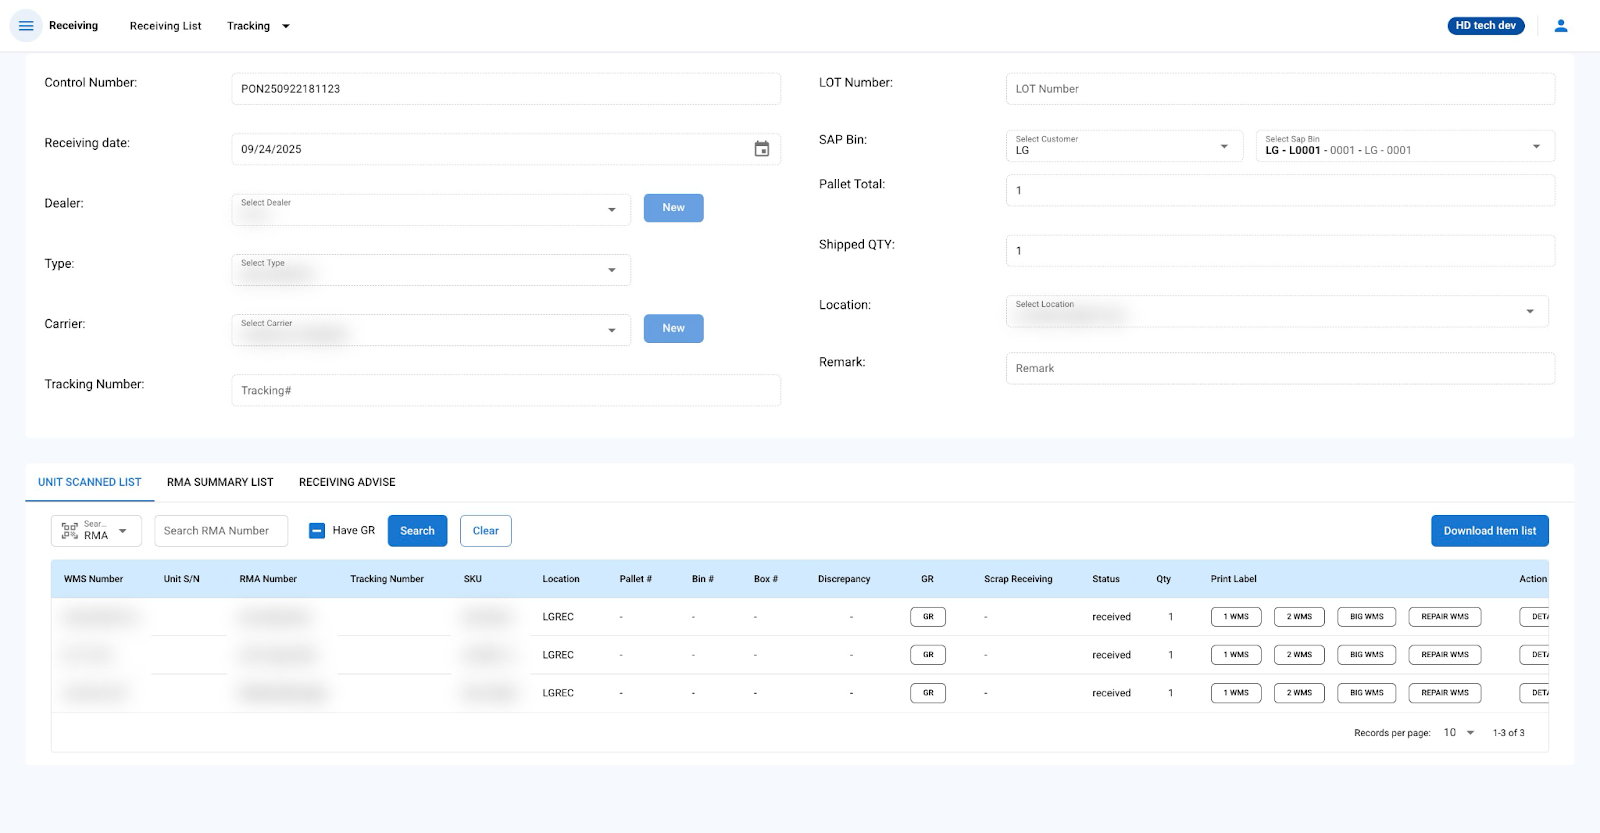
Managing the Receive Scan Completed List

After scanning items, you can manage and review the list of completed scans to ensure proper inventory tracking and handling discrepancies. Here is how to navigate and utilize the list:
Filtering Scanned Items
Search by RMA: Enter an RMA number in the search field to filter the list for specific items.
Search by S/N (Serial Number): Enter a serial number in the search field to filter the list for a specific item.
Have GR: Select this checkbox to filter items that have been marked as Goods Receipted (GR).
Discrepancy Occurred: Check this box to filter for items that have been identified with discrepancies.
Batch Processing and Editing
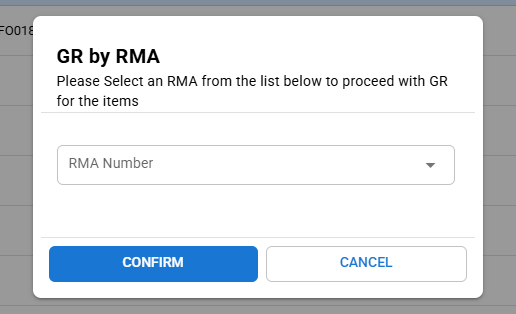
GR BY RMA: The GR by RMA function allows users to perform a Goods Receipt (GR) for multiple received items that have the selected RMA number in the system.
In the pop-up, you will see a dropdown menu labeled RMA Number.
Select Existing RMA: Choose the appropriate RMA number from the dropdown list to proceed with the GR for items associated with that RMA.
GR SELECTED: Use this button to mark multiple selected items as GR. Simply check the boxes next to the items and click "ALL GR."
Discrepancy Checkbox: Directly from the list, you can check or uncheck the discrepancy box for each item. Please note that you cannot use the discrepancy checkbox if an item is already GR.
GR Button: Click the GR button next to an item to mark it as Goods Received. This button will be disabled if the item does not have an associated RMA number. Once an item is marked as GR, the button will be replaced by the GR date.
Editing Item Details
- Click the "Edit" button to open a pop-up window where you can review and modify item details such as SKU, Discrepancy, GR, COO, and RMA number.
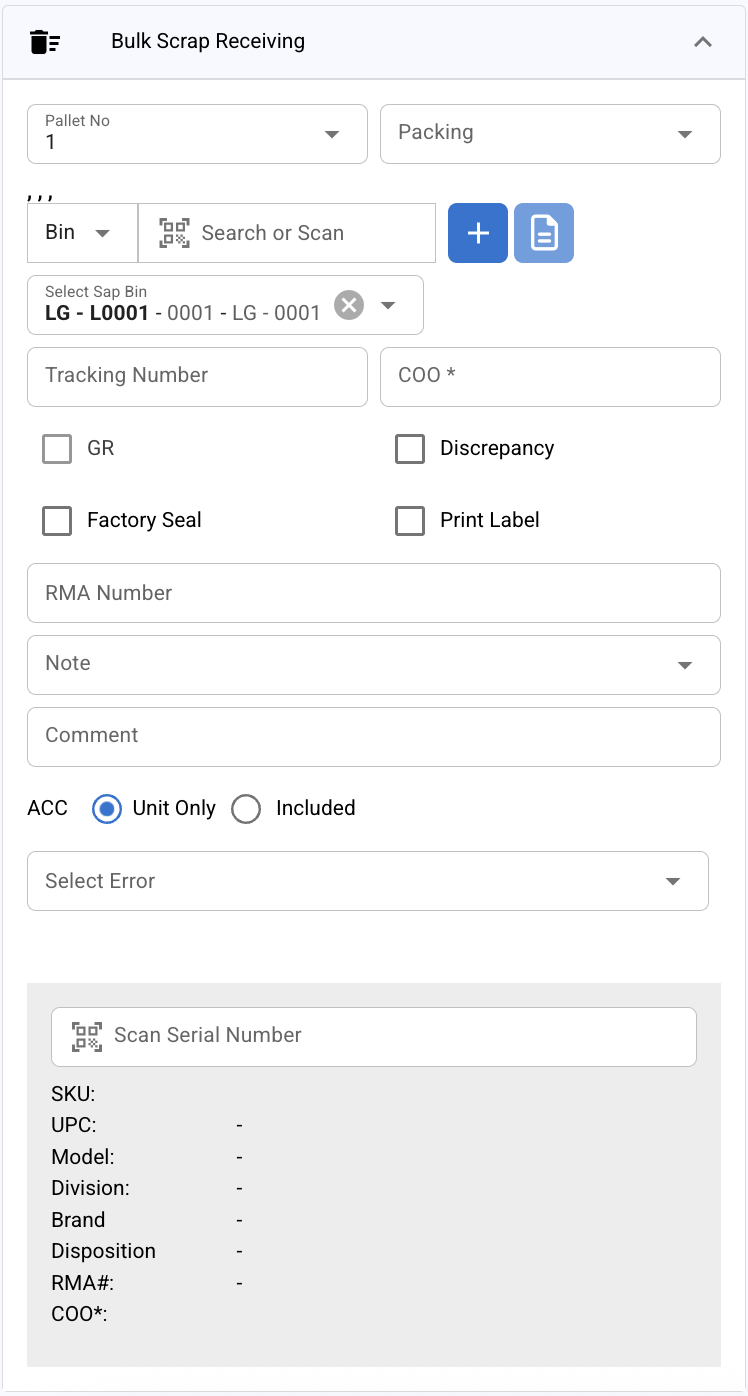
Bulk Receiving Group
The Bulk Receiving page streamlines the process of scanning and recording multiple similar items, enhancing efficiency when dealing with large quantities of the same product.
Preparing for Bulk Scanning
Before starting the bulk scanning process, users need to input necessary details to ensure each scanned item is correctly logged.
Initial Details
Please note that the details of each field are similar to those of the receiving group.
Container Number
Tracking Number: Enter the tracking number associated with the items.
COO (Country of Origin): This field is optional if the COO can be derived from the serial number during scanning. If not, manually enter the COO.
GR (Goods Receipt): Check this box to mark items as received immediately after scanning.
Discrepancy: Check this if there is a known issue with the bulk items being received.
Print Label: Select this option if labels should be printed automatically after each item is scanned.
Factory Seal, RMA Number, Packing, Note, Comment, ACC: Similar to the Receiving group these fields may be filled out as needed, with some being optional.
Scanning Items
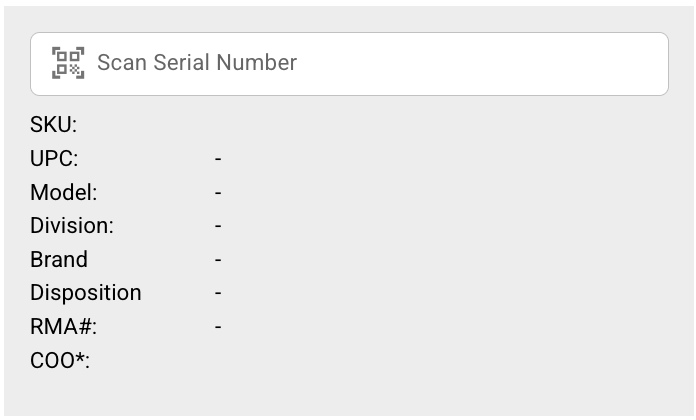
- Scan Serial Number: As items are scanned, the system will automatically save each item's details without the need for clicking a "save" button. This facilitates rapid processing of multiple items.
Post-Scanning Actions
- There is no "Save and Print Label" button in the Bulk Receiving process. The system is designed to record each scanned item instantly, and the label printing is contingent on the Print Label checkbox setting.
Considerations
- The user interface does not allow for editing in the scanning section, as the intention is for immediate record-keeping and processing. This ensures that the bulk receiving workflow is as swift as possible, reducing the time spent on each item.
By following the above steps, users can efficiently process large shipments, ensuring accurate tracking and documentation within the warehouse management system.
Bulk Scrap Receiving Group
The Bulk Scrap Receiving page is tailored for processing items that are to be categorized as scrap due to damage or other issues.
Setup for Bulk Scrap Processing
Before scanning items as scrap, certain details must be entered to ensure proper classification and record-keeping.
Required Information
Container Number
Tracking Number:
COO (Country of Origin): Fill in the COO for the items if not automatically provided by the scanning process.
GR (Goods Receipt): Check this box if the items are to be marked as received in the system.
Discrepancy: Select this option to mark the items as having a discrepancy.
RMA Number: Choose an existing RMA number or create a new one for the items.
Packing: Select the type of packing the scrap items came in.
Error Code: Choose one or multiple error codes to describe the issue with the scrap items.
Note, Comment, ACC: Provide additional details, comments, and indicate if the scrap items come with any accessories.
Scanning Scrap Items
- Scan Serial Number: As scrap items are scanned, the system will log each item based on the pre-entered details.
By following these procedures, warehouse staff can efficiently manage and document items that are not fit for regular stock due to defects or damage.
Receiving Non Serial Group
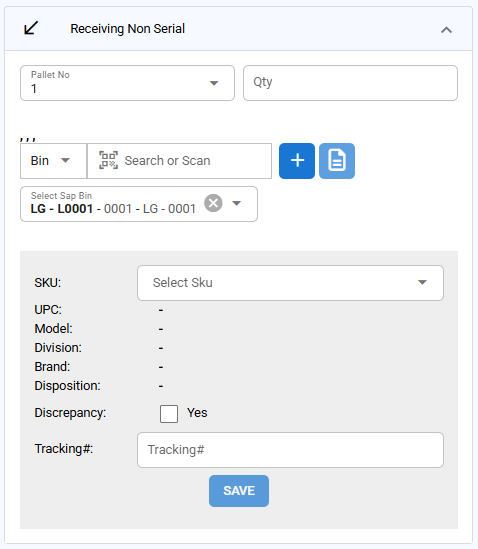
This component of the Warehouse Management System (WMS) is designed to facilitate the receiving of non-serial items. Follow the steps below to efficiently use this component.
Pallet No: The number of the pallet being received.
Qty: Enter the quantity of items being received.
Container Number: There are three types of containers you can select: pallet, bin, and box. The container is where you will place the items for storage and tracking within the warehouse. You can click on the + button to add a new container
Select SAP Bin Dropdown: Choose the appropriate bin for storing the received items from the dropdown list.
Discrepancy Checkbox: If there is a discrepancy with the received items, check this box to indicate so.
COO: Enter the country of origin for the received items.
Tracking#: Enter the tracking number associated with the shipment of the received items.
Save Button: After entering all necessary information, click this button to save the data and print a label for the received items.
This component functions similarly to the "Receiving Non-Serial" component but is specifically designed for handling scrap items. The primary difference is that the items received will be marked as scrap
For both the "Receiving Non-Serial" and "Receiving Scrap Non-Serial" components, the Goods Receipt (GR) process differs from that of serial items. Unlike serial items, you cannot complete the GR process for non-serial items immediately after scanning them. Instead, you must complete the GR process for all non-serial items simultaneously by using the "All GR" button on the control number list.
Receiving Scrap Non Serial Group
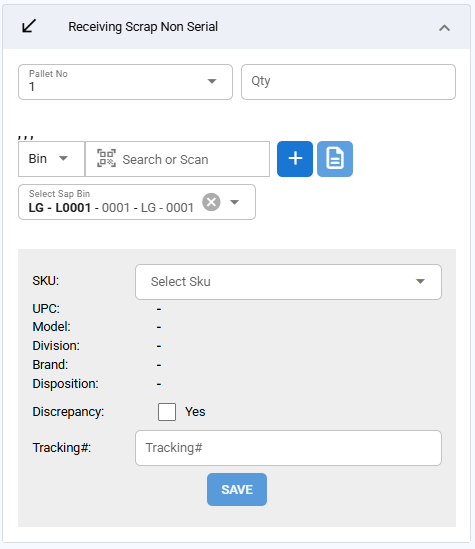
This component functions similarly to the "Receiving Non-Serial" component but is specifically designed for handling scrap items. The primary difference is that the items received will be marked as scrap
For both the "Receiving Non-Serial" and "Receiving Scrap Non-Serial" components, the Goods Receipt (GR) process differs from that of serial items. Unlike serial items, you cannot complete the GR process for non-serial items immediately after scanning them. Instead, you must complete the GR process for all non-serial items simultaneously by using the "All GR" button.
Selecting SKU for Items with Multiple SKUs for the Same Serial Number Prefix
When scanning an item, the system checks the serial number. If it detects that the serial number prefix is associated with multiple SKUs, it will prompt the user to select the appropriate SKU for the item.
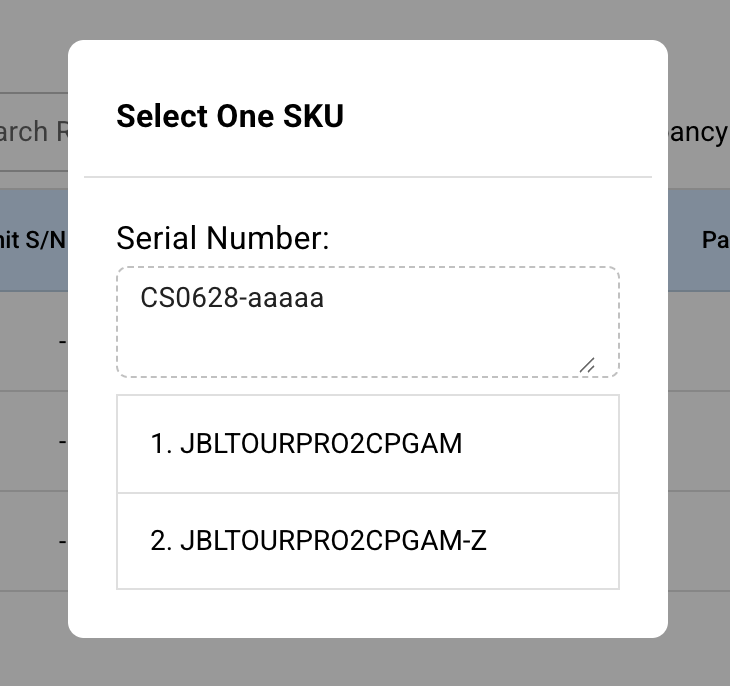
Steps to Select SKU:
Scan or Enter Serial Number:
Begin by scanning or manually entering the serial number of the item.
If the serial number prefix is linked to more than one SKU, the system will automatically display a dialog box titled Select One SKU.
Review the Serial Number:
The serial number that was scanned or entered will be shown at the top of the dialog in the Serial Number field.
Verify that the serial number matches the item you are processing.
Select the Correct SKU:
A list of available SKUs associated with the serial number prefix will be displayed below.
Review the SKUs and select the correct SKU by clicking on the desired option.
Proceed with the Next Step:
- After selecting the appropriate SKU, the system will proceed with the item processing as usual.
When scanning an item, if the system detects that the serial number prefix belongs to multiple SKUs, it prompts the user to select the correct SKU. However, if subsequent items scanned have the same serial number prefix as the previous item, the system will automatically use the previously selected SKU, and no further selection is required.
Attaching RMA to Multiple Items

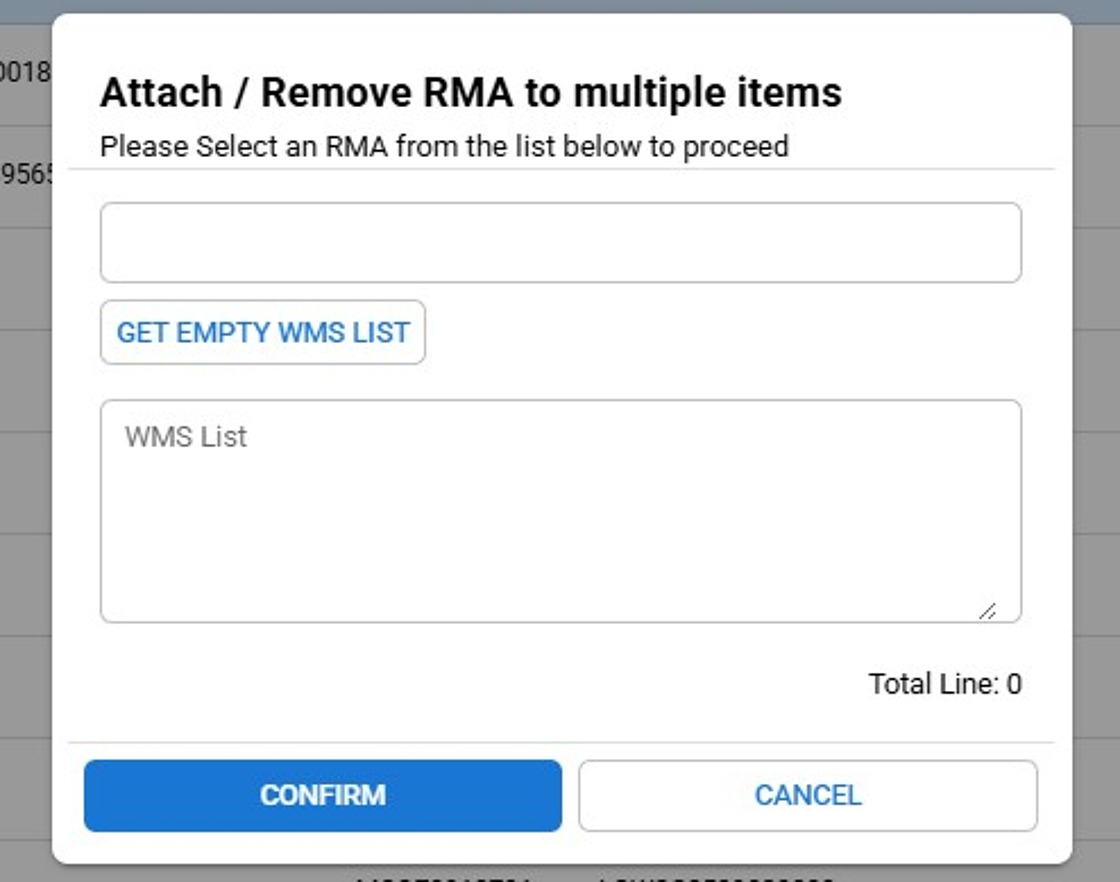
This feature allows users to attach a Return Merchandise Authorization (RMA) to multiple items in one step. Users can either retrieve the list of items automatically or manually paste WMS numbers.
Click on the "Attach / Remove RMA" Button:
- After scanning or selecting the relevant items in the system, click the Attach RMA button to open the dialog box titled "Attach RMA to multiple items."
Adding an RMA:
- Locate the first empty field and enter an RMA Number.
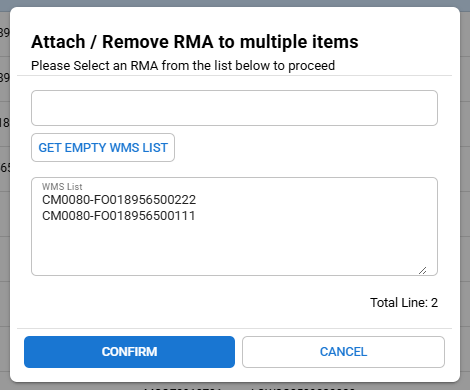
Adding WMS List
In the designated WMS List field, manually paste the WMS numbers.
Format the numbers appropriately: Place one WMS number per line, or separate them with commas (e.g., "WMS123, WMS456”)
Confirm or Cancel the Action:
Once you have verified the correct RMA and WMS items:
Click CONFIRM to attach the selected RMA to all items listed in the WMS field.
Click CANCEL if you decide not to proceed with the attachment.
Once you confirm attaching the RMA to multiple items, the system processes the request and displays a result dialog. This dialog shows the outcome of the RMA attachment, including the number of successful and failed attachments.
Failure Conditions:
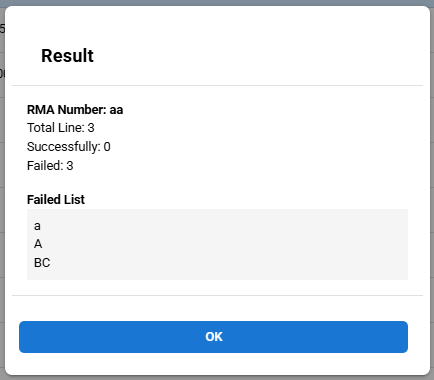
GR Completed:
- The attachment process will fail for any WMS items that have completed the GR process.
RMA Already Exists:
- If an item already has an RMA attached, the system will reject the attempt to attach another RMA. This prevents duplicate RMAs from being associated with the same item.
WMS Number Not Found:
- If the system cannot find the specified WMS number, the RMA attachment will fail. This may occur due to invalid or incorrect WMS numbers being entered into the system.
Non-serial WMS:
- The system will fail to attach the RMA if the WMS item is marked as Non-serial. Only serial-controlled WMS items can have RMAs attached. Non-serial items are not eligible for this process.
No Valid WMS Numbers Found:
- If the system fails to find any valid WMS numbers during the attachment process, it will report success = 0 and fail = 0. This edge case occurs when the system is unable to process any of the provided WMS numbers, likely due to invalid data or missing items.
Removing RMA from Multiple Items
The process is similar to adding an RMA but involves leaving the RMA field blank to signal a removal action.
Finalizing the Receiving Process and Reviewing Control Number Details
Upon successful completion of Goods Receipt (GR) for all items under a control number, the system will update the status to "Completed." To access comprehensive details of the received items and their associated RMA Summary List, follow these instructions
Control Number Completion
Status Update
- Once a control number is marked as GR, the system will change its status to "Completed."
Accessing Detailed Information
- To view the specific details of a completed control number, click on the Detail button corresponding to the control number in the receiving list.
Detailed Item Information
Viewing Scanned Items
- Within the control number details, you'll find the Unit Scanned List tab displaying all the scanned items associated with the control number.
Report Download
- To download a comprehensive report of all scanned units and RMA summaries, click the Download Report button. This report will provide a detailed record suitable for inventory management and auditing purposes.
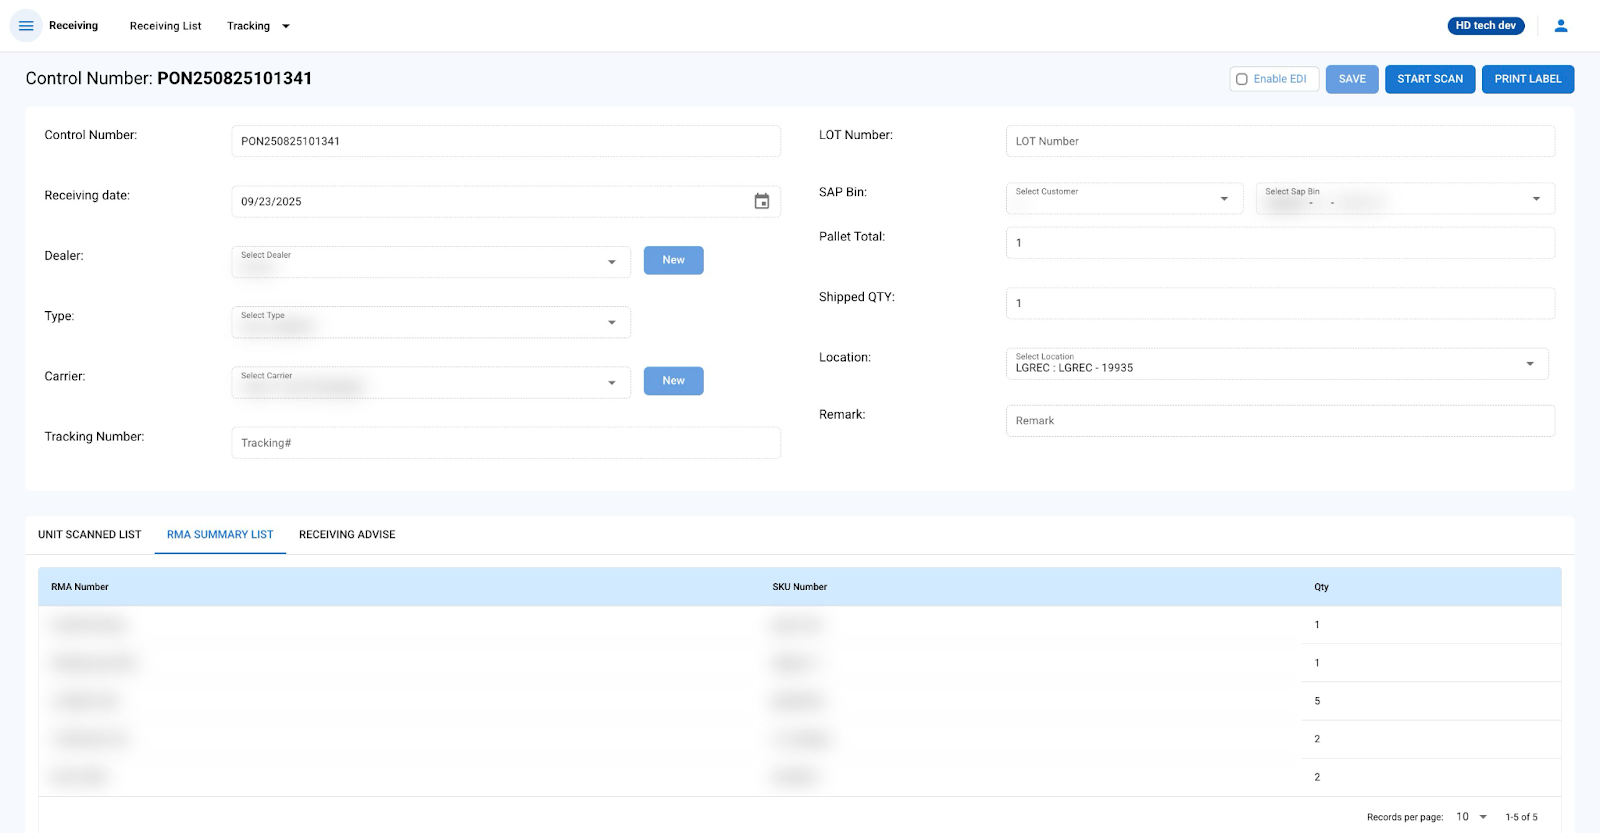
RMA Summary
- The RMA Summary List tab provides an overview of all RMA numbers, quantities, and their statuses related to the control number.
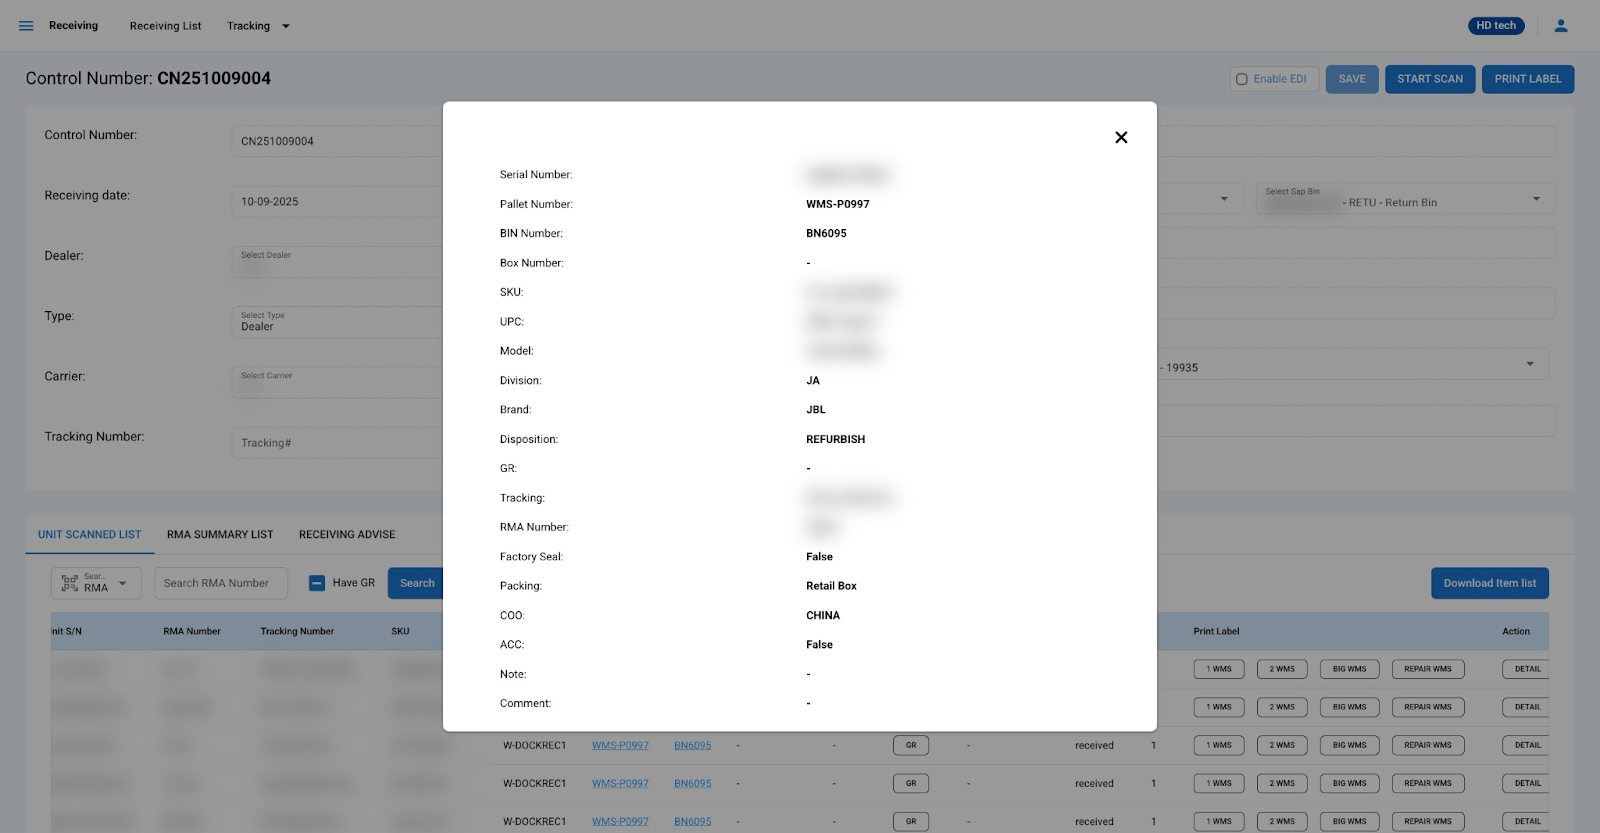
Item-Specific Details
- For a granular view of each item, click the Detail button next to the item entry. A pop-up will display detailed information, including serial number, SKU, status, and any discrepancy notes.
By following these steps, warehouse personnel can ensure that all items are properly received, recorded, and tracked within the warehouse management system.
Internal Import
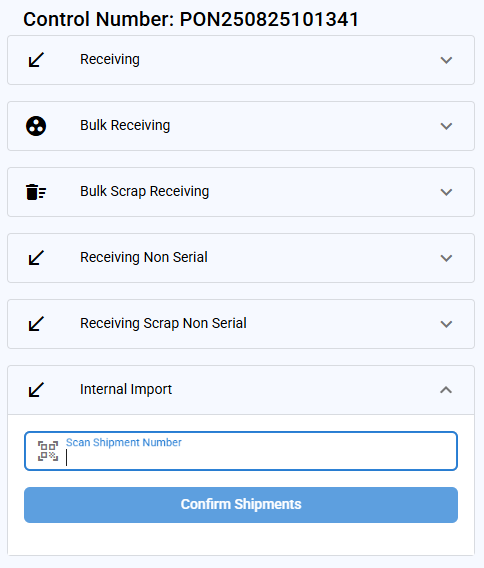
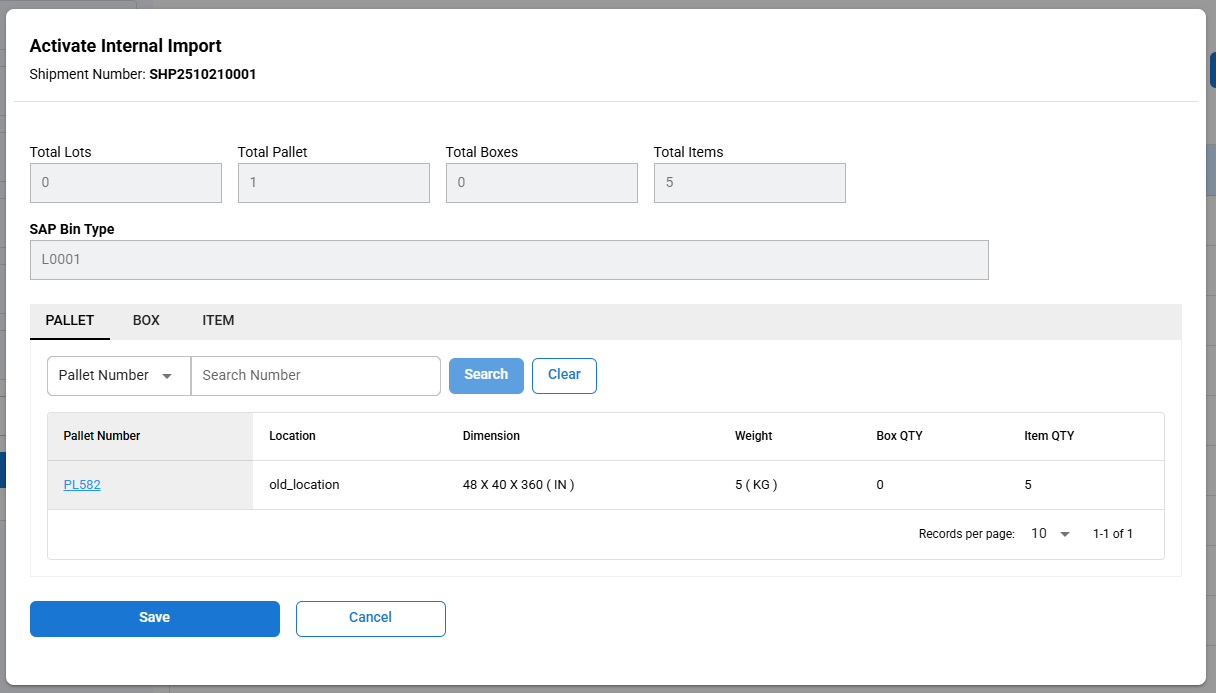
The Internal Import is used when items are moved between warehouses or storage locations within the same company, rather than coming from an external supplier.
An Internal Transfer Shipment is created in the system (this process will be explained later in the Shipment section).
Scan or enter the shipment number.
A pop-up window will appear, allowing you to review and confirm the details for the internal import.
Click Save, and the items from the shipment will be transferred into the current control number.